Thursday, September 24, 2009

Enabling Citrix Merchandising Server paravirtualized vm to run on Hyper-V

Be warned, Citrix Support will not support your Merchandising Server if you follow these steps.

And - this is really antique and no longer works with Hyper-V 2012.

Here is my scenario:

I have a fully paravirtualized Linux virtual machine (Merchandising Server) that is made to run on a xen hypervisor (the family of hypervisors that enable Linux VMs to boot kernel-xen and run in a truly paravirtualized and highly efficient way).
I want to move that vm over to another hypervisor (non-xen) for a client demonstration.
Warning:  This might seem a bit convoluted, but it really isn’t difficult.  However there are a few tools involved.  The steps that apply to your situation all depends on how easy it is to get your virtual disk into a format that you can mount and edit the boot volume.  Follow these instructions at your own risk, a positive outcome is not guaranteed.  The resulting VM will most likely not be supported if it has problems.
Collecting the elements:
I am going to use a few things that I need to obtain (download) and tools that need to be installed.

Why so many tools?

The Merchandising Server is the appliance that I am using for the example.  XenConvert is to convert the XVA (XenServer export format) into an OVF based appliance.  The Kensho OVF Tool is to import the OVF into Hyper-V.  The Linux distribution “Live CD” is to mount the virtual disk of the example appliance so we can modify the Grub boot loader and drop a file.  And the v1 Linux Integration Components have the magic PV kernel shim that we need.

Details, details, missing details.  What gives?

I am going to state right now that; I am not going to go into deep and gory details describing each and every click that is required with each tool.  If you read my blog, I assume a couple things: that you have a clue, or you want one.  And that you are not afraid of figuring things out, or trying and failing (I am also implying that you know how to make back-ups of things before you go mucking them up).

The business at hand:

  1. Expand the Merchandizing bz2 zip archive. (WinRAR can do this, and others as well)
  2. Use Citrix XenConvert 2.x to convert from “Xen Virtual Appliance” to “Open Virtualization Format (OVF) Package
    • Do not create an OVA, just an OVF.
  3. Use Citrix Kensho OVF Tool to Import the OVF Package from step 2 to a Hyper-V host.
    • Or you could just copy the VHD from step 2 to your Hyper-V host and create a new VM.
    • Do not boot the VM at this time.
  4. Attach the Live CD ISO to the VM
  5. Set the boot order to boot from DVD first
  6. Remove the default Network Adapter and add a Legacy Network Adapter
  7. Add a second DVD drive
  8. Attach the Hyper-V (v1) Linux IC ISO to the second DVD drive of the VM
  9. Boot the VM into the Live CD and log in to its console
    • Debian will auto logon as ‘user’.
  10. switch to root:  sudo –i
    • This is specific to Debian Live
  11. Discover the IDE disks:
    • cd /dev
    • ls hd*
  12. Mount the virtual disk (the vhd)
    • make a mount point folder:  mkdir /mnt/mine
    • mount the disk to the folder:  mount /dev/hda1 /mnt/mine
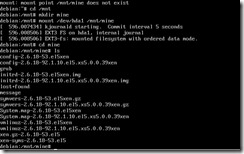
  13. explore the volume
    • cd /mnt/mine
    • ls
    • Mine looks like a /boot volume:
    • clip_image001
  14. Mount the Linux IC DVD drive (mine is the second dvd on controller 2):
    • mkdir /mnt/cdrom
    • mount /dev/hdd /mnt/cdrom
  15. Copy the kernel shims from the ISO to the virtual disk
    • cd /mnt/cdrom/shim
    • cp *.* /mnt/mine
  16. Edit the device.map
    • cd /mnt/mine/grub
    • nano device.map
    • Before: clip_image002
    • After: clip_image003
  17. Edit the GRUB bootloader to load the shim and the kernel.
    1. nano menu.lst
    2. comment the ‘hiddenmenu’ option and increase the timeout so I can test.
      • clip_image004
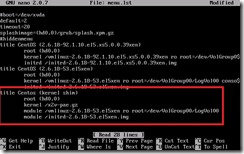
    3. Create a new entry specific to the shim and the distribution kernel-xen
      • Notice that the kernel is the shim copied from the previous step and the existing kernel and initrd load as modules of the shim.
      • clip_image005
    4. Modify the default selection to point to my new entry.
      • The default entry begins counting at “0”
      • clip_image006
  18. Unmount the virtual disk and the cdrom
    • cd /
    • umount /dev/hda1
    • umount /dev/hdd
  19. Shutdown the virtual machine and remove the ISOs from the DVD drive (also remove the second virtual dvd drive).
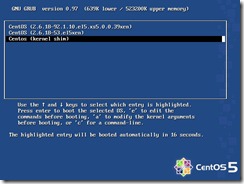
  20. Boot the virtual machine, note the new menu selection that was created – this is the kernel that should boot.
    • clip_image007
Note: If you run VMware – This will not run on VMware, the shim is specific to Hyper-V.

Thursday, September 17, 2009

HyperV networking works on Server 2008 R2 guest but not Server 2008 guest

The Scenario:

Hyper-V R2 (Server 2008 R2) host, Server 2008 guest (not R2), Server 2008 R2 guest

The situation plays out like this:

I create a VM and install Server 2008 R2 Standard.

The external network, connecting me to the internet, works fine and the guest OS automatically has a working network device and connection.

I shut down this VM and leave it off.

I then create another VM, exactly the same, choosing the same external network as above. This time I install Server 2008 Standard (non-R2).

The server does not find its network card, and therefore cannot connect to the internet. When I look at the guest OS, there is a yellow splat in the device manager for the virtual network adapter.


My first question in response to this:

Did you install the Integration Components within the VM?


Here is why:
Server 2008 has the ICs built in to the OS (they are extremely similar to device drivers).

But, versioning issues can come into play - the host and guest must match for optimum performance.

With the release of R2 the ICs included backward compatibility - thus allowing an R2 VM to 'just work' when you install it onto a Hyper-V v1 (2008, but not 2008 R2) host.

Now, when you have a Server 2008 VM on an R2 host - the VM built-in ICs are older than the host ICs - thus the ICs in the VM need to be updated.

Using the Hyper-V manager Console, open the console of the VM and choose Action, Install Integration Services - then respond to any prompts.

Thank you “Kelly AZ” for describing this problem so well in the TechNet forum.

http://social.technet.microsoft.com/Forums/en-US/winserverhyperv/thread/c08e2f66-802b-43b0-aa9c-589695c31678/

Tuesday, September 15, 2009

Importing VMware Studio with Citrix OVF Tool to Hyper-V

This is something that I just had to try.

I imported the VMware Studio 2 Beta virtual appliance to a Hyper-V R2 host using Citrix OVF Tool.  Quite fun actually, and pretty easy.

Yes, I did a video, just to prove it.

http://www.citrix.com/tv/#video/1070

First, the preparation:

Begin by creating a Network Share for your OVF Library.

Create a folder under that for the VMware Studio appliance download.

Download the VMware Studio 2 virtual appliance and place it in the folder you created.

Download and install the Citrix OVF Tool.

http://community.citrix.com/display/xs/Kensho

(please download the admin guide as well – it hides behind the “show documentation” link).

Read the Admin Guide.

Second, Run the Citrix OVF Tool.

Add your library share.

Add your Hyper-V host (I am assuming that you read the admin guide and set up Windows Remote Management properly).  Also shown here: http://www.citrix.com/tv/#video/971

Select the Import tab of the OVF tool.

Select and then right-click the VMware Studio OVA and select Convert to OVF.

After the convert process has finished select the VMware Studio OVF, Select the target Hyper-V Host, then select the mapping button.

Complete the VM requirement to host resource mapping wizard.

Select the check box to run the Operating System Fix-up (this is important).

Begin the import.

After the import completes open the Hyper-V manager, and open the settings of the imported vm most likely called “Virtual Hardware Family”

Remove the “Network Adapter”, then add a “Legacy Network Adapter”, and select the virtual network that it should be attached to.

Now you can boot the VMware Studio appliance and complete the setup.

There you have it, simple as that, running on Hyper-V.

Monday, September 14, 2009

Another boot from VHD article

I have seen lots of instructions about booting from a VHD.  A new Windows 7 feature (actually a feature of the new Windows bootloader that is part of Win 7 and Server 2008 R2).

This is a component of the native VHD support that is part of the latest release.

Anyway, on MSDN of all places I stumble upon some nicely written, easy to follow instructions of how to do this. (I find it when I am not looking for it – go figure).

My gratitude to Charlie Calvert for posting.

http://blogs.msdn.com/charlie/archive/2009/09/02/booting-from-a-vhd.aspx