Thursday, July 17, 2008

Managing Hyper-V snapshots - the basics

This came out of a blog comment that I thought needed some attention. Really basic; “what happens” type of stuff.

(Although, I truely feel that a little time exploring the user interface and anyone could figure this out on their own.)

I have written about snapshots quite a bit as Hyper-V snapshots are a new thing for most folks.

Not that a snapshot is new (or a checkpoint for those of you using SCVMM), but the way that Hyper-V does it is definitely different.

You can find those previous posts here, here, and here.

Anytime you think Hyper-V snapshots, always remember that the integrity of the timeline must be maintained. That is key to grokking the concept.

Now, let’s begin.

First of all, you can create a snapshot ( wow, amazing stuff ). This creates a differencing disk that reverences your base VHD, thus you always have that base VHD to return to, and saves your current memory status (if your VM was running).


Second, you can Apply a snapshot. This takes me back to the point in time that is represented by the snapshot I selected. It does this by the same process as above, it creates a differencing disk and attaches it to the VHD that is referenced by the snapshot.


Okay, if I am losing you – you need to back up and read the posts I referenced above.


For the next couple you need to think about trees and the branching of a tree structure. The simplest way to show this is a single picture of an expanded tree (visual aids are always good).


Third, I can delete a single snapshot. This deletes the moment in time that a snapshot represents, its differencing disk and any saved memory state. If a snapshot is ‘below’ this one on the subtree, then its reference pointers are modified to reference the proper snapshot ‘above’ it.
In this example I deleted Snapshot B.1

There are other things happening here as well. To maintain integrity of the snapshot timeline the differencing disks need to be merged. This happens in the background when a VM is powered off and I will save the gritty details for another post.

Fourth, I can delete a snapshot subtree. This deletes the moment in time that a snapshot represents and any other snapshots that are ‘below’ it in the tree. Thus it does what a delete does, but without selecting individual snapshots, it takes an entire branch. Yes, we get a merge, not a revert as I mistakenly put in my graphic.


Now, to get started on the really complicated post..what happens under the hood.

I have alluded to this before with the instructions about how to manually merge VHDs. Maybe I need to back up even more and talk about differencing disks...hmm..

Friday, July 11, 2008

Unable to template Server 2008 virtual machine with SCVMM or deployment fails unable to customize

I struggled with this myself, and it is an issue that an administrator rarely has to deal with anymore.

Any administrator that has had to set domain password secirity levels and enforcements, knows what I am talking about. Password security policy.

Let's back up and talk about VMM first.
My references are going to be specific to SCVMM 2008 (since that is what is new and improved - this can apply to VMM 2007 in some cases).

In VMM there are two ways to create VM templates.

One is to select the Library view, Click the New Template action to launch the wizard. Select the button to use an existing virtual machine.
After you finish the wizard, the VM is prepared to be a template. One of these steps involves using the local administrator credentials that you provided and actually modifying the VM with a blank local administrator password and running sysprep. This way, on deployment of the template, there is a blank administrator password that allows the injection of the OS Profile (sysprep answer file - sysprep.inf or unattend.xml) to finish the deployment.

The other way to create a template is from an existing VHD that is already stored in the Library. Following the process above - VMM expects that the VHD has been prepared by the administrator with a blank local administrator password and sysprep has been run.

(This is all in the documentation BTW - no secrets are being revealed).

Now, why does the tempolating process fail? Especially with Server 2008? - this is where the machine local security policy comes in.

Start -> Administration Tools -> Local Security Policy (this is within the VM - just to make sure that you were following along)
Account Policies -> Password Policy

Minimum Password Length must be 0 (this is a blank password that we are trying to accept)
Password must meet complexity requirements must be disabled.

Wait a minute...I just tried changing these settings in my VM and I can't...what's up?

Most likely, your VM is joined to a Domain and the Domain security policy is overriding the local security policy - you remember, strictest and/or last applied wins.

Unjoin your VM from the Domain, set the local security password policy, shutdown the VM - return to the VMM New Template wizard and prepare your VM as a template.

This will get you past the security bug when you create templates.

In the case of VHDs that have been used to create templates - If you did not set the local administrator password to blank then the deployment of the VM will fail, not the template creation.

It is a different step in the process, and a different failure, but the same cause.

BTW - just to clarify. When I said the local administrator password needed to be blank I didn't mean the letters b.l.a.n.k or the word 'blank' - I meant (in programmer terms) empty string - null - nothing.

Wednesday, July 9, 2008

Remoting devices into a Hyper-V child (virtual machine)

I have answered many questions about this in the forums, but I keep forgetting to document it. It took my wife asking me how to remote her Smart Card into a Hyper-V VM this morning that caused me to think about it again.

If you are using Hyper-V, you have already discovered that there is no support for remoting local devices into a Hyper-V VM. This is by design.

Hyper-V is an enterprise level hypervisor, like ESX, like XenServer, like VirtualIron, etc. None of those platforms support remoting devices either.

To guarantee a division between the parent and the children (host and its VMs) this separation must be maintained.

You may have also figured out that the Hyper-V console uses remote desktop protocol (RDP) to present the VM desktop. It does this by the host actually proxying the desktop from the VMs virtual video card. No different than ESX or XenServer using VNC under the covers. However, this limits you to network based resources and keyboard and mouse.

You, of course, want more.

It is really pretty simple, you simply use the Remote Desktop Client (RDC) to remote directly into your VM (don’t use the Hyper-V VM console client).


First, you must tweak your RDC connection.

1. Open the Remote Desktop Client (this must be version 6.1 or higher).

2. Select the Options button (the one with the arrows showing you that there is More to it).

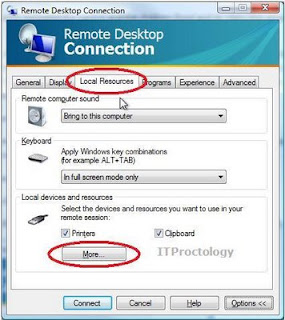
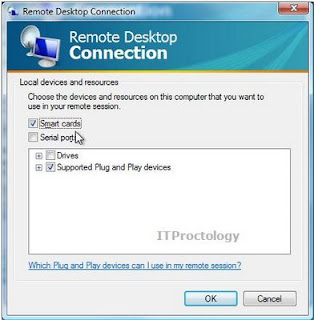
3. Select the Local Resources TAB

4. Select More


5. Now, choose those devices that you want to remote into your VM.


In my case I have Smart Cards and PnP devices selected.

But I could also choose drives, serial ports, etc. Expand the trees, look around.

Now, this will only work with the Remote Desktop Client, not the Remote Desktops Client (did you notice the ‘s’ ?).


And - this is very important - you must successfully log in to the remote VM after adding these settings, or else the settings changes are lost.

Okay, back to the previous thought..

Remote Desktops is for management, Remote Desktop is for remoting the user experience, they are different animals.

So, for all you testers, developers, people with Hyper-V on your laptops, etc. Here you go. You can have your Hyper-V and your weird devices too.

Oh, another caveat - if you RDP into a Windows Server 2008 box (machine or VM) using RDP and you want to take all your neat-o cool devices in with you - you need to enable the Desktop Experience feature on the Server 2008 box (machine or VM). This is what installs all the support for all the neat-o cool things that we all enjoy on our desktops.