Friday, June 27, 2008

Plenty of Hyper-V RAM but I can't start my VM

I have been toying with writing about this. And I say toying becuase I have been digging and digging in an attempt to find some good documentation about RAM management, usage, and allocation when running Hyper-V.

Guess what? Very little has been documented so far.

The title comes out of the TechNet Hyper-V forum and has finally been dealt with on Tony Voellm's MSFT blog. However, it isn't the entire picture - there is more going on here than a simple NUMA bug.

What I have been able to uncover is this:
  • The parent partition reserves 256 MB RAM for itself that can never be consumed by a VM.
  • Each VM that is running carves a physical slice of RAM out of the hardware.
  • Each VM causes an additional 32 + 8 Mb of RAM to be used by the paraent partition for over head and management (not unique to Hyper-V).

Now, all that being said, this is what I have been able to uncover and verify in some way.

Server sizing recommendations follow that of Server 2008, plan on at least 512 Mb of RAM for the parent and then add on for the children (the actual VM RAM plus overhead).

Now - to the issue.

The NUMA bug:
Tony Voellm talks about a NUMA bug here:
http://blogs.msdn.com/tvoellm/archive/2008/06/11/can-t-start-my-vm-when-there-is-plenty-of-memory.aspx

This article keeps pointing to caching..
There is also a few threads in the TechNet forum that have resolved this issue in another way.

the root thread is here:
http://forums.technet.microsoft.com/en-US/winserverhyperv/thread/908d304c-0746-4272-ac7f-85cf4350f2f2/

The solution on this thread? - disable automatic pagefile management in the parent partition.

Again, we go back to paging (or caching..)

So, something is going on under the hood that I am sure will be fixed but for now think ahead and take a look at the articles.

Personally, I would try changing the page file setting or relying on Remote Management before applying a patch, but that is just me.. :-)

Thursday, June 26, 2008

Hyper-V went RTM (early, late,does anyone remember?)

For any of you following Hyper-V this is all over the blog space - I am not breaking any news here.

You can find the update here:

http://support.microsoft.com/kb/950050

Upgrading from Beta or RC0 or RC1:

If you have any VMs with a saved state be sure to remove that saved state prior to upgrading the Host.

  • This is any VM with a saved memory state
  • A VM currently in “Saved”
  • A VM that had an online snapshot taken – while the VM was running
  • Delete the online snapshot (from the Hyper-V Manager), power down the VM, wait for the snapshot merge process to complete.

Cleanly shutdown all VMs prior to upgrade of the Host

  • Not cleanly shutting down a VM will cause the Host to place the VM into a saved state by default, thus creating the risky condition above.

You can patch the WS08 guests prior to upgrading the Host

  • Just power them down instead of re-booting

Be sure to upgrade the Integration Services in all children

  • Simply open a console connection to the VM, login, choose Actions -> insert Integration Services disk and allow the upgrade to happen.
  • If the new device wizard appears in the VM, it will prevent the Integration Services from being upgraded
  • Just cancel the new device wizard within the VM


Using SCVMM 2008 Beta:

To this moment the VMM team has reported no issues with the Hyper-V RTM when the SCVMM Hyper-V RC1 patch has been installed. (your mileage my vary)

To obtain the SCVMM Beta Hyper-V RC1 Compatibility patch:
https://connect.microsoft.com/Downloads/Downloads.aspx?SiteID=580

When installing the patch, have some patience – it will cause strange things to happen until you push new agents onto each managed host (after the host is raised to Hyper-V RC1) and the Hyper-V RC1 patch must be applied to the SCVMM Server (in addition to the SCVMM patch).

SCVMM 2008 Operations Manager integration - I made it work

There has been a lot of consternation regarding getting the Operations Manager integration working with SCVMM 2008 Beta.


Unfortunately, this took me four tries and three rebuilds of my SCVMM server and my Operations Manager server.


Why the pain? The fancy new PRO Tips feature, thats why. So I have spelled out all that I had to do.

My personal opinion of this feature? It works, it does what it does. It has a ton of potential.


If you want to get this working on your environment, give the following a try:


Prerequisites (note: install them in this order):
1. OpsMgr 2007 SP1 installed on the OpsMgr server
2. All of the dependant Management Packs are installed:
· Microsoft.Windows.InternetInformationServices.CommonLibrary.MP
· Microsoft.Windows.InternetInformationServices.2003.MP
· Microsoft.SQLServer.Library.mp
· Microsoft.SQLServer.2005.Monitoring.mp
· Microsoft.SQLServer.2005.Discovery.mp
· Microsoft.SystemCenter.VirtualMachineManager.2008.mp
· Microsoft.SystemCenter.VirtualMachineManager.Pro.2008.Library.mp
· Microsoft.SystemCenter.VirtualMachineManager.Pro.2008.HyperV.HostPerformance.mp
· Microsoft.SystemCenter.VirtualMachineManager.Pro.2008.VMRightSize.mp
· Microsoft.SystemCenter.VirtualMachineManager.Pro.2008.VMWare.HostPerformance.mp
· Microsoft.Virtualization.Reports.2008.mp
3. Install an OpsMgr console on the SCVMM 2008 server (update to SP1)
4. Add your SCVMM 2008 server computer account to the local Administrators group of the OpsMgr server.
5. Add your host clusters to SCVMM 2008 – the hosts must be grouped as clusters (this applies to both Hyper-V and ESX hosts (ESX Hosts must be clustered in VirtualCenter)).
6. Install OpsMgr agent on all hosts and virtual machines.
7. For a VM to generate PROTips, the OpsMgr Agent must be installed on the VM.
8. Enable remotesigning ( set-executionpolicy remotesigned ) on the SCVMM 2008 and OpsMgr servers. – This step may not be necessary
9. Install the SCVMM administration console on the Operations Manager server. (it is currently unclear if this is a bug or by design)

Configure PRO tips for each host cluster.
1. Go to PRO tab in the Host Cluster Properties dialog box
2. Select "Enable Host PRO on this host cluster" check box
3. Select the severity level "Critical Only" or "Warning and Critical"
4. Decide if you want to let SCVMM 2008 automatically take actions based on the recommendation by checking "Automatically implement PRO tips on this host cluster", and you can also further scope the auto-implement method only applies to "Critical Only" or "Warning and Critical" PRO tips.
Microsoft recommends: "Bake time" (this is quoted from a SCVMM 2008 PM blog)
· It's NOT recommended for users to enable PRO immediately after finishing install of SCVMM. Users are encouraged to get a stable environment first.
· For PROtips to successfully migrate a VM, SCVMM 2008 requires some performance data to be collected.
· Typically, two days of VM operation "bake time" should be sufficient.

This is most likely because some actions require history to establish a baseline in Operations Manager, and to make sure that integration is functioning correctly.

Turn on PRO for the cluster within SCVMM 2008

On SCVMM 2008 console, go to Administration view, select "System Center" node on the Administration list, double-click on the "Operations Manager Server" line on the middle pane, and specify the OpsMgr 2007 root management server.

Verification of PRO configuration

The way to verify if the configuration was successful, is to go to OpsMgr console, open Discovered Inventory in Monitoring Space, Change Target Type to PRO Enabled Managed VM, PRO Enabled Managed Host and PRO Enabled ESX Server.
Tuesday, June 24, 2008

This is excellent! - Gizmodo goes to Lego

For most geeks (young and old) Lego holds a near and dear place in our hearts.

I hold great kudos to Gizmodo for sapping my attention span today..

http://gizmodo.com/tag/legotrip

This is too cool..
http://gizmodo.com/5018247/lego-employees-have-minifigs-as-business-cards-and-a-great-sense-of-humor

All I can say is: wow. I would cry for hours if my ladder fell over while working on this..
http://gizmodo.com/5018606/750000+brick-kennedy-space-center-is-the-mother-of-all-lego-models

DMZ isolation of VMs with Hyper-V

I recently posted this in the TechNet forums and thoguht that it needed a bit longer life.

Mostly, this is about understanding virtual machine networking under a hypervisor (ESX, XenSERver, Hyper-V, etc.) and that they all basically work the same.

The simplest way to accomplish isolating VM traffic into a DMZ is to do a form of physical network isolation.

Your Host has two physical NICs.

Connect NIC 1 to the management network. Connect NIC 2 to the DMZ network.

Create two External Virtual Network Switches - one per physical NIC and name them appropriately.

Connect your VMs only to the DMZ virtual network switch (using the VM settings).

Login to your Hyper-V Host console - check the network connections. You most likely have a Virtual Network Adapter (possibly two).
You may end up with one for each virtual network switch. If this is the case, open the properties of the Virtual Network Adapter that is attached to the DMZ virtual Network switch and remove (uncheck) all protocols - this will prevent any traffic from the Host into the DMZ and vice versa.

The alternative is VLAN IDs.

Now..backing up.

Looking at network connections within the Hyper-V console can be confusing.

When you first install the Hyper-V role you have Physical NICs and properties just like you know and love from any Windows server. As soon as you create an external virtual network switch the physical NIC only has the virtual network protocol bound to it (it is no longer 'owned' by the Host, but instead by the Hypervisor) - leave this NIC alone.

If your Host was using this physical NIC it is now given a new virtual network adapter that is attached to the virtual network switch which is in turn using the physical NIC - therefore keeping the host on the same physical network.

The part that makes this confusing is that we CAN look at the network connections, and we CAN play with things just like we have with Windows Server for years. However, now we have to realize that the architecture is different - a mix of what we knew, a dash of what we saw with Virtual Server on Server 2003, and parts that are totally new becuase we have a hypervisor and a virtualization stack.

Saturday, June 7, 2008

How to manually merge Hyper-V snapshots into a single VHD

Okay, so you have to recreate your VM configuration and you absolutely know that your VM had a snapshot at some time.

You also realize that if you just link to the base VHD that you will lose the current state of your VM - what do you do?


You manually merge your snapshots into your base VHD before you boot your VM. (I am assuming that you know how to connect to an existing VHD using the new VM wizard).
Merging of snapshots can be performed manually. This is achieved by:

  1. On your Hyper-V host.Power off the Virtual Machine.
  2. Make a copy of the VHD and its corresponding AVHD files.
  3. Rename the AVHD extension to VHD.
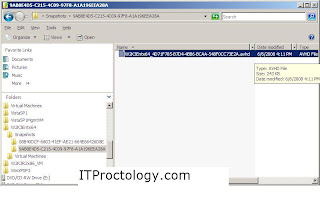
  4. Write down the order of the disks from youngest to oldest (the oldest should be the root VHD). You can do this by looking at the last modified time stamp on the origional AVHD files, find the one that last changed. And find the last one that changed before it.
  5. In the Hyper-V manager, open the Edit Disk wizardBrowse to the youngest VHD in the chain, then choose 'reconnect' to point to the next youngest (the one that came before).
  6. Open the Edit Disk wizard a second time and merge.
  7. Then repeat the process until you have only a single VHD.

In a disaster case, you need to recover a copy of the root VHD prior to attaching it to a new VM and booting it (the act of booting it, modifies it)

Usually the most difficult part of this process is finding the last AVHD (differencing disk) in the chain.

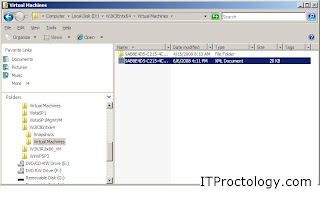
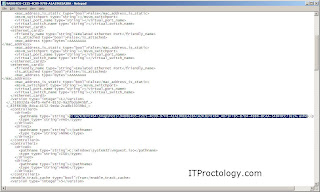
The easiest way to do this is to find the configuration file for the VM.


Then open up that configuration file and locate the information for the virtual hard disk. In the screen shot below is the location of the current running state of the VM. The snapshot is a point in time to return to, the current running state is the "Now" and is contained in a differencing disk (AVHD) after a snapshot has been taken.


Now, find that AVHD file within the file system and rename it to VHD.

Now, go back tot he Hyper-V manager and open the "Edit Disk" wizard - Select the disk that you renamed above, and merge this disk into the one before it.

This process can be continued until all of the snapshots are merged back into a single VHD (the base VHD).

Hyper-V lost my vm and I connected to the vhd and lost everything..now I am panicking

I have read this story on the TechNet forums a few times. Something happened in Hyper-V, either a patch, or a temporary burp, or something else happened that caused a VM to be 'lost' from the Hyper-V console.

That might not be the worst thing.

Then a well meaning and informed administrator creates a new VM configuration attaching tot he existing VHD only to discover that a great deal of time on the life of the VM is gone.

What happened??

Most likely what happened was that your VM had a snapshot(s). If you claim that it didn't - think back, did you ever create one, then delete it? (and, you have not powered off the VM for an extended period of time to allow that deleted snapshot to be merged back into the base vhd..)

First of all the state of your VM may have been lost for good. The reason? - snapshots

I have blogged a bit about snapshots (here and here, and here) and they continue to cause confusion. I am guessing that the confusion comes from a lack of understanding of the underlying system.

The state of the VM is lost because the differencing disk integrity is broken. A differencing disk is a vhd that is chained onto an existing vhd. The first vhd (the base) stops receiving writes and the new vhd (the differencing disk) receives all of the writes to disk.the other item to know is that vhd is block based - therefore the differencing disk depends on the fact that the base disk does not change. If at any time you connect tot he base disk and modify it (even slightly) - the differencing disk chain is broken and there is not a tool (yet) that can put it back together.

Okay, you are now the better informed administrator - you made this mistake once and you tell yourself - never again!

This is a new post..

Monday, June 2, 2008

Remotely managing Server Core using compmgmt.msc

We all have those days when we want a nice graphical view of a Windows server so we can quickly compare installations, we can't remember the command line syntax properly, or (as some CLI zealots would put it) we just want a nice lazy interface.

Well, if you try to connect to Server Core - we all have run into the standard firewall rule of enabling Remote Management on Server Core. Well...this is just a portion of the picture.

What if you want to bring a disk volume on-line (this is what brought me to this in the first place), and you don't want to type and then take it back off-line. (darn it, I want my right click - I want to do this relatively quickly, and I don't want to fish around for the CLI commands).

My Google-fu was working well this morning and I found an excellent posting by Sander Berkouwer about getting all the rules and settings right to remotely administer a Server Core WS08 install using the Computer Management MMC snap-in.

Here it is:
http://blogs.dirteam.com/blogs/sanderberkouwer/archive/2008/04/03/remotely-managing-your-server-core-using-compmgmt-msc.aspx